Ubuntu24.04とPX-Q3PE4とchinachuで録画サーバーを作る

環境

$ cat /etc/os-release
PRETTY_NAME="Ubuntu 24.04.1 LTS"
NAME="Ubuntu"
VERSION_ID="24.04"
VERSION="24.04.1 LTS (Noble Numbat)"
VERSION_CODENAME=noble
ID=ubuntu
ID_LIKE=debian
HOME_URL="https://www.ubuntu.com/"
SUPPORT_URL="https://help.ubuntu.com/"
BUG_REPORT_URL="https://bugs.launchpad.net/ubuntu/"
PRIVACY_POLICY_URL="https://www.ubuntu.com/legal/terms-and-policies/privacy-policy"
UBUNTU_CODENAME=noble
LOGO=ubuntu-logo
$ uname -a
Linux tiny-rec01 6.8.0-41-generic #41-Ubuntu SMP PREEMPT_DYNAMIC Fri Aug  2 20:41:06 UTC 2024 x86_64 x86_64 x86_64 GNU/Linux

ユーザーの追加とタイムゾーンの設定

# 必要に応じてデフォルトのエディタを変更
$ sudo update-alternatives --config editor

# 必要に応じてadduserでユーザーを作っておきsudoできるようにしておく
$ sudo adduser rec
$ sudo visudo

#タイムゾーンの設定
$ timedatectl
               Local time: Wed 2024-07-17 13:03:12 UTC
           Universal time: Wed 2024-07-17 13:03:12 UTC
                 RTC time: Wed 2024-07-17 13:03:13
                Time zone: Etc/UTC (UTC, +0000)
System clock synchronized: yes
              NTP service: active
          RTC in local TZ: no
$ sudo timedatectl set-timezone Asia/Tokyo
$ timedatectl
               Local time: Wed 2024-07-17 22:03:44 JST
           Universal time: Wed 2024-07-17 13:03:44 UTC
                 RTC time: Wed 2024-07-17 13:03:45
                Time zone: Asia/Tokyo (JST, +0900)
System clock synchronized: yes
              NTP service: active
          RTC in local TZ: no

PX-Q3PE4ドライバーのインストール
https://github.com/kazuki0824/recisdb-rs を見ながら粛々と入れる

$ wget https://github.com/tsukumijima/px4_drv/releases/download/v0.4.5/px4-drv-dkms_0.4.5_all.deb
$ sudo apt install -y ./px4-drv-dkms_0.4.5_all.deb

# インストール後に下記エラーが出るがよくわからない
N: Download is performed unsandboxed as root as file '/home/rec/px4-drv-dkms_0.4.5_all.deb' couldn't be accessed by user '_apt'. - pkgAcquire::Run (13: Permission denied)

# 確認
$ lsmod | grep -e ^px4_drv
px4_drv               237568  0

$ ls /dev/px4video*
/dev/px4video0  /dev/px4video1  /dev/px4video2  /dev/px4video3  /dev/px4video4  /dev/px4video5  /dev/px4video6  /dev/px4video7
# なんかエラーが出るが動いてるっぽいので無視
[  530.875453] ------------[ cut here ]------------
[  530.875456] UBSAN: array-index-out-of-bounds in /var/lib/dkms/px4_drv/0.4.5/build/driver/ptx_chrdev.c:78:25
[  530.875485] index 2 is out of range for type 'ptx_chrdev [1]'
[  530.875499] CPU: 2 PID: 1255 Comm: recisdb Tainted: G           OE      6.8.0-41-generic #41-Ubuntu
[  530.875502] Hardware name: LENOVO 10RRS3B900/3136, BIOS M1UKT28A 02/18/2019
[  530.875503] Call Trace:

B25デコーダーのインストール
https://github.com/kazuki0824/recisdb-rs を見ながら粛々と入れる

$ wget https://github.com/kazuki0824/recisdb-rs/releases/download/1.2.2/recisdb_1.2.2-1_amd64.deb
$ sudo apt install ./recisdb_1.2.2-1_amd64.deb

# インストール後に下記エラーが出るがよくわからない
N: Download is performed unsandboxed as root as file '/home/rec/recisdb_1.2.2-1_amd64.deb' couldn't be accessed by user '_apt'. - pkgAcquire::Run (13: Permission denied)

#うまくいくとこんな感じの表記になる
$ recisdb checksignal --device /dev/px4video2 --channel T27
[2024/09/01 16:32:10] INFO:     recisdb version 1.2.2
[2024/09/01 16:32:10] INFO:     Tuner: /dev/px4video2
[2024/09/01 16:32:10] INFO:     Channel: T27 / Terrestrial: 27
41.04dB

$ recisdb tune --device /dev/px4video2 --channel T27 --time 10 test.m2ts
[2024/09/01 16:36:59] INFO:     recisdb version 1.2.2
[2024/09/01 16:36:59] INFO:     Tuner: /dev/px4video2
[2024/09/01 16:36:59] INFO:     Channel: T27 / Terrestrial: 27
[2024/09/01 16:36:59] INFO:     Recording duration: 10 seconds
[2024/09/01 16:37:00] INFO:     Decode: Enabled
[2024/09/01 16:37:00] INFO:     Recording...
[2024/09/01 16:37:10] INFO:     Decoder: 21479424B received, and 18858656B converted.

うまくいかない場合はこんなエラーが出る

# チャンネルがなかったりするとこんな感じ
$ recisdb checksignal --device /dev/px4video2 --channel T18
[2024/09/01 16:31:52] INFO:     recisdb version 1.2.2
[2024/09/01 16:31:52] INFO:     Tuner: /dev/px4video2
[2024/09/01 16:31:52] INFO:     Channel: T18 / Terrestrial: 18
[2024/09/01 16:31:58] ERROR:    Channel selection failed. The channel may not be received.

# BCASカードが認識できなかった時
$ recisdb tune --device /dev/px4video2 --channel T27 --time 10 test.m2ts
[2024/09/01 16:34:37] INFO:     recisdb version 1.2.2
[2024/09/01 16:34:37] INFO:     Tuner: /dev/px4video2
[2024/09/01 16:34:37] INFO:     Channel: T27 / Terrestrial: 27
[2024/09/01 16:34:37] INFO:     Recording duration: 10 seconds
[2024/09/01 16:34:38] INFO:     Decode: Enabled
[2024/09/01 16:34:38] ERROR:    Failed to initialize the decoder. (BCAS_CARD_ERROR_NO_SMART_CARD_READER)
[2024/09/01 16:34:38] INFO:     Disabling decoding and continue...
[2024/09/01 16:34:38] INFO:     Recording...

Mirakurun の設定とインストール
https://github.com/Chinachu/Mirakurun

# nodejsのインストールとmirakurunのインストール
$ curl -sL https://deb.nodesource.com/setup_18.x | sudo -E bash -
$ sudo apt-get install -y nodejs
$ sudo apt install build-essential
$ sudo npm install pm2 -g
$ sudo npm install mirakurun -g --unsafe-perm --foreground-scripts --production
$ curl http://127.0.0.1:40772/api/version
$ sudo mirakurun stop

# ISDBScanner でチャンネルスキャン
$ sudo wget https://github.com/tsukumijima/ISDBScanner/releases/download/v1.1.6/isdb-scanner -O /usr/local/bin/isdb-scanner
$ sudo chmod +x /usr/local/bin/isdb-scanner
$ isdb-scanner --exclude-pay-tv ./scanned/

# ISDBScanner でチャンネルスキャンしたデータをmirakurunにコピー
$ sudo cp -a scanned/Mirakurun/channels.yml /usr/local/etc/mirakurun/channels.yml
$ sudo cp -a scanned/Mirakurun/tuners.yml /usr/local/etc/mirakurun/tuners.yml
$ sudo chown -R root /usr/local/etc/mirakurun/
$ sudo mirakurun start

chinachu のインストール
https://github.com/Chinachu/Chinachu/wiki/Gamma-Installation-V2 この辺を見ながら

$ git clone https://github.com/Chinachu/Chinachu.git ~/chinachu
$ cd ~/chinachu/
$ ./chinachu installer


# pythonの古い文法が使われててエラーが出るので修正
$ vim ~/chinachu/.nave/installed/14.18.3/lib/node_modules/npm/node_modules/node-gyp/gyp/pylib/gyp/input.py
# 234行目の Ur を r に変更する
234       build_file_contents = open(build_file_path, 'Ur').read()
# 変更後
234       build_file_contents = open(build_file_path, 'r').read()


$ cp config.sample.json config.json
$ vim config.json
$ echo [] > rules.json
$ ./chinachu service wui execute
$ ./chinachu update
$ sudo pm2 start processes.json
$ sudo pm2 save
$ sudo pm2 startup

ベルトファン購入メモ

色々買ったのでメモ。
大体ベルトに引っ掛ける所が壊れる・吸気の所に服が張り付いて排気ができない というのがあるのでその辺を工夫しているガジェットを買うのがポイントだと思われる。

KEYNICE ベルトファン 携帯扇風機 腰掛け USB充電式 5000mAh パワフル ポータブルファン 3段階風量調節 ミニ 扇風機 腰掛け/首掛け/手持ち/卓上 工事 屋外作業用 ジェットファン 熱中症対策 アウトドア ブラック KN-1733

¥2,624
ベルトに引っ掛ける所が折れた。
表面からの吸気は殆ど無く、横と下から吸気するため、服が張り付いて吸気ができないと言うのはあまりなかった気がする
シロッコファン

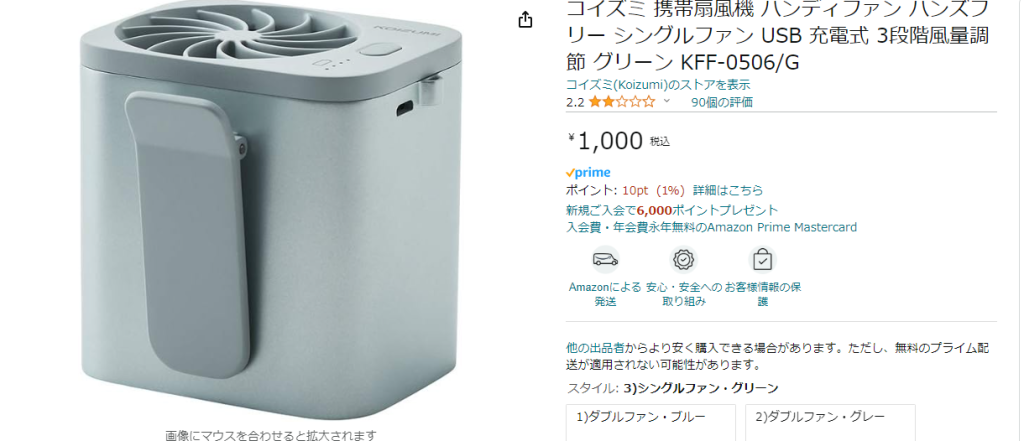
コイズミ 携帯扇風機 ハンディファン ハンズフリー シングルファン USB 充電式 3段階風量調節 グリーン KFF-0506/G
コイズミ 携帯扇風機 ハンディファン ハンズフリー ダブルファン USB 充電式 3段階風量調節 ブルー KFF-0505/A


どっちも1000円前後
KFF-0506は、ベルトの所がクリップなので壊れなかったが本体がすぐ壊れた。
KFF-0505もすぐ壊れた。
駆動音がでかい
おすすめはしない。
プロペラファン

Kinscoter 6000mAh Hanging Neck/Waist Fan USB Mini Portable Rechargeable Fan For Outdoor Camping Hiking Climbing Running Sports

2000円くらい
吸気が表面側で申し訳程度に下か吸気ができる。
横からも吸気できるようにしてほしい。
一週間ほど使用しているがまだベルトに引っ掛ける部分は壊れていない
シロッコファン

Portable Waist Fan USB Rechargeable Hanging Neck Fan 4000mAh Mini Electric Fans Outdoor Sports Waist Clip On Fan with Power Bank

1000円くらい
小さいが、風量が弱い、micoUSB充電。
シロッコファン

curlを使い SwitchBot のAPIを使ってプラグミニの情報を取ってみた

1. トークンの取得
SwitchBot のアプリを開いて「プロフィール」→「設定」をクリック、「アプリバージョン」の項目を10回ほどタップすると 「開発者向けオプション」という項目が出てくる。
「開発者向けオプション」をタップしたら、「トークンの取得」と「クライアントシークレット」という項目が出てきます。
今回は「トークンの取得」にかかれている文字列を利用します。

2. デバイスIDの取得
1 で取得したトークンを元に下記の様にcurl を実行し、対象のデバイスIDを取得します。
今回はプラグミニのデバイスIDを利用します。

$ token="「トークンの取得」にかかれている文字列"
$ curl -s -H "Authorization:${token}" https://api.switch-bot.com/v1.0/devices | jq "."
{
  "statusCode": 100,
  "body": {
    "deviceList": [
      {
        "deviceId": "6055F938A492", <- ココ
        "deviceName": "プラグミニ(JP) 92",
        "deviceType": "Plug Mini (JP)",
        "enableCloudService": true,
        "hubDeviceId": ""
      },
(...snip...)
  },
  "message": "success"
}

プラグミニの情報を取得する。
2 で取得したデバイスIDを元に、下記のようにcurlするとプラグミニの情報が帰ってくる。

# 機器の電源が入ってない時

$ deviceid=6055F938A492
$ curl -s -H "Authorization:${token}" "https://api.switch-bot.com/v1.0/devices/${deviceid}/status" | jq "."
{
  "statusCode": 100,
  "body": {
    "deviceId": "6055F938A492",
    "deviceType": "Plug Mini (JP)",
    "hubDeviceId": "6055F938A492",
    "power": "on",
    "voltage": 100.5,
    "weight": 0,
    "electricityOfDay": 633,
    "electricCurrent": 0
  },
  "message": "success"
}


# 機器の電源が入ってる時

$ curl -s -H "Authorization:${token}" "https://api.switch-bot.com/v1.0/devices/${deviceid}/status" | jq "."
{
  "statusCode": 100,
  "body": {
    "deviceId": "6055F938A492",
    "deviceType": "Plug Mini (JP)",
    "hubDeviceId": "6055F938A492",
    "power": "on",
    "voltage": 100.5,
    "weight": 41.5,
    "electricityOfDay": 632,
    "electricCurrent": 0.012
  },
  "message": "success"
}

あとはよしなにjqで整形して監視ツールとかに投げればよい。
jsonのキーの説明は公式が参考になる。 https://github.com/OpenWonderLabs/SwitchBotAPI#plug-mini-jp-1

Ubuntu22.04とPX-MLT5PEとchinachuで録画サーバーを作る

環境

$ cat /etc/os-release
PRETTY_NAME="Ubuntu 22.04.1 LTS"
NAME="Ubuntu"
VERSION_ID="22.04"
VERSION="22.04.1 LTS (Jammy Jellyfish)"
VERSION_CODENAME=jammy
ID=ubuntu
ID_LIKE=debian
HOME_URL="https://www.ubuntu.com/"
SUPPORT_URL="https://help.ubuntu.com/"
BUG_REPORT_URL="https://bugs.launchpad.net/ubuntu/"
PRIVACY_POLICY_URL="https://www.ubuntu.com/legal/terms-and-policies/privacy-policy"
UBUNTU_CODENAME=jammy
$ uname -a
Linux rec07 5.15.0-48-generic #54-Ubuntu SMP Fri Aug 26 13:26:29 UTC 2022 x86_64 x86_64 x86_64 GNU/Linux

ユーザーの追加とタイムゾーンの設定

# 必要に応じてadduserでユーザーを作っておきsudoできるようにしておく
$ sudo adduser rec
$ sudo visudo

#タイムゾーンの設定
$ timedatectl
               Local time: Sun 2022-09-25 00:09:32 UTC
           Universal time: Sun 2022-09-25 00:09:32 UTC
                 RTC time: Sun 2022-09-25 00:09:32
                Time zone: Etc/UTC (UTC, +0000)
System clock synchronized: yes
              NTP service: active
          RTC in local TZ: no
$ timedatectl set-timezone Asia/Tokyo
$ timedatectl
               Local time: Sun 2022-09-25 09:10:15 JST
           Universal time: Sun 2022-09-25 00:10:15 UTC
                 RTC time: Sun 2022-09-25 00:10:15
                Time zone: Asia/Tokyo (JST, +0900)
System clock synchronized: yes
              NTP service: active
          RTC in local TZ: no

PX-MLT5PEドライバーのインストール
https://github.com/nns779/px4_drv を見ながら粛々と入れる

$ sudo apt install -y unzip gcc make dkms
$ mkdir src
$ cd src/
$ git clone https://github.com/nns779/px4_drv.git
$ cd px4_drv/fwtool/
$ make
$ wget http://plex-net.co.jp/plex/pxw3u4/pxw3u4_BDA_ver1x64.zip -O pxw3u4_BDA_ver1x64.zip
$ unzip -oj pxw3u4_BDA_ver1x64.zip pxw3u4_BDA_ver1x64/PXW3U4.sys
$ ./fwtool PXW3U4.sys it930x-firmware.bin
$ mkdir -p /lib/firmware
$ sudo cp it930x-firmware.bin /lib/firmware/
$ cd ../

# DKMSを使用する
$ sudo cp -a ./ /usr/src/px4_drv-0.2.1
$ sudo dkms add px4_drv/0.2.1
$ sudo dkms install px4_drv/0.2.1
$ lsmod | grep -e ^px4_drv
px4_drv               143360  0
$ reboot
$ ls -l /dev/pxmlt5video*
crw-rw-r-- 1 root video 234, 0 Sep 25 09:25 /dev/pxmlt5video0
crw-rw-r-- 1 root video 234, 1 Sep 25 09:25 /dev/pxmlt5video1
crw-rw-r-- 1 root video 234, 2 Sep 25 09:25 /dev/pxmlt5video2
crw-rw-r-- 1 root video 234, 3 Sep 25 09:25 /dev/pxmlt5video3
crw-rw-r-- 1 root video 234, 4 Sep 25 09:25 /dev/pxmlt5video4
crw-rw-r-- 1 root video 234, 5 Sep 25 09:25 /dev/pxmlt5video5
crw-rw-r-- 1 root video 234, 6 Sep 25 09:25 /dev/pxmlt5video6
crw-rw-r-- 1 root video 234, 7 Sep 25 09:25 /dev/pxmlt5video7
crw-rw-r-- 1 root video 234, 8 Sep 25 09:25 /dev/pxmlt5video8
crw-rw-r-- 1 root video 234, 9 Sep 25 09:25 /dev/pxmlt5video9

arib25ライブラリのインストール

$ sudo apt install -y cmake  build-essential libpcsclite-dev
$ cd ~/src/
$ git clone https://github.com/stz2012/libarib25.git
$ cd libarib25/
$ cmake .
$ make
$ sudo make install

recpt1のインストール
https://github.com/stz2012/recpt1 を参考に

$ sudo apt install -y autoconf automake
$ cd ~/src/
$ git clone https://github.com/stz2012/recpt1.git
$ cd recpt1/recpt1/
$ ./configure --enable-b25
$ make
$ sudo make install

autoconf automake が無いと下記の感じで怒られる

You must have autoconf installed to compile recpt1.
Get ftp://ftp.gnu.org/pub/gnu/autoconf/autoconf-2.62.tar.gz
(or a newer version if it is available)

You must have automake installed to compile recpt1.
Get ftp://ftp.gnu.org/pub/gnu/automake/automake-1.10.1.tar.gz
(or a newer version if it is available)

録画の確認
エラーが出たら上の手順をやり直す

$ recpt1 --device /dev/pxmlt5video1 --b25 --strip --sid hd 27 10 ~/test.ts
using device: /dev/pxmlt5video1
using B25...
enable B25 strip
pid = 3942
device = /dev/pxmlt5video1
C/N = 26.500628dB
Recording...
Available sid = 1024 1025 1408 65520 
Chosen sid    = 1024
Available PMT = 0x1f0 0x3f0 0x1fc8 0x1cf0 
Recorded 10sec

Mirakurunのインストール
この辺を見ながらインストール

$ curl -sL https://deb.nodesource.com/setup_16.x | sudo -E bash -
$ sudo apt-get install -y nodejs pkg-config

# 公式だとsudo /path/to/nave.sh usemain 16 って書いてあるけどよくわからない…
$ sudo npm install -g nave
$ nave usemain 16
$ sudo apt install build-essential
$ sudo npm install pm2 -g
$ sudo npm install mirakurun -g --unsafe-perm --foreground-scripts --production
$ sudo npm install arib-b25-stream-test -g --unsafe
$ sudo mirakurun config tuners # 下のテキストっぽく修正
$ sudo mirakurun restart

sudo mirakurun config tuners

- name: PX-MLT5PE0
  types:
    - GR
  command: /usr/local/bin/recpt1 --device /dev/pxmlt5video0 <channel> - -
  decoder: arib-b25-stream-test
  isDisabled: false
- name: PX-MLT5PE1
  types:
    - GR
  command: /usr/local/bin/recpt1 --device /dev/pxmlt5video1 <channel> - -
  decoder: arib-b25-stream-test
  isDisabled: false
- name: PX-MLT5PE2
  types:
    - GR
  command: /usr/local/bin/recpt1 --device /dev/pxmlt5video2 <channel> - -
  decoder: arib-b25-stream-test
  isDisabled: false
- name: PX-MLT5PE3
  types:
    - GR
  command: /usr/local/bin/recpt1 --device /dev/pxmlt5video3 <channel> - -
  decoder: arib-b25-stream-test
  isDisabled: false
- name: PX-MLT5PE4
  types:
    - GR
  command: /usr/local/bin/recpt1 --device /dev/pxmlt5video4 <channel> - -
  decoder: arib-b25-stream-test
  isDisabled: false
- name: PX-MLT5PE5
  types:
    - GR
  command: /usr/local/bin/recpt1 --device /dev/pxmlt5video5 <channel> - -
  decoder: arib-b25-stream-test
  isDisabled: false
- name: PX-MLT5PE6
  types:
    - GR
  command: /usr/local/bin/recpt1 --device /dev/pxmlt5video6 <channel> - -
  decoder: arib-b25-stream-test
  isDisabled: false
- name: PX-MLT5PE7
  types:
    - GR
  command: /usr/local/bin/recpt1 --device /dev/pxmlt5video7 <channel> - -
  decoder: arib-b25-stream-test
  isDisabled: false
- name: PX-MLT5PE8
  types:
    - GR
  command: /usr/local/bin/recpt1 --device /dev/pxmlt5video8 <channel> - -
  decoder: arib-b25-stream-test
  isDisabled: false
- name: PX-MLT5PE9
  types:
    - GR
  command: /usr/local/bin/recpt1 --device /dev/pxmlt5video9 <channel> - -
  decoder: arib-b25-stream-test
  isDisabled: false

チャンネルスキャン

sekki@rec07:~$ curl -X PUT "http://localhost:40772/api/config/channels/scan"
channel scanning... (type: "GR")

-> new 3 channels found.
-> existing 8 channels merged.
-> total 11/34 (GR/Any) channels configured.
(snip...)
channel scan has been completed and saved successfully.
**RESTART REQUIRED** to apply changes.

chinachu のインストール
https://github.com/Chinachu/Chinachu/wiki/Gamma-Installation-V2 この辺を見ながら 

$ git clone https://github.com/Chinachu/Chinachu.git ~/chinachu
$ cd ~/chinachu/
$ ./chinachu installer
Chinachu Installer Menu:
[!] These are installed under all /home/rec/chinachu/...
[!] Recommend the Auto installation.
1) Auto (full)
2) submodule
3) Node.js Environment
4) Node.js Modules
5) ffmpeg
what do you install? > 1

$ cp config.sample.json config.json
$ vim config.json #公式を見ながら修正
$ echo [] > rules.json
$ ./chinachu service wui execute
$ ./chinachu update
$ sudo pm2 start processes.json
$ sudo pm2 save
$ sudo pm2 startup

諸々終わったらchinachuにアクセスして確認
http://chinachu:20772/

最新版の storcli をインストールするメモ

毎回忘れるのでメモ

[root@fedora ~]# uname -a
Linux fedora 5.15.16-200.fc35.x86_64 #1 SMP Thu Jan 20 15:38:18 UTC 2022 x86_64 x86_64 x86_64 GNU/Linux
[root@fedora ~]# cat /etc/redhat-release 
Fedora release 35 (Thirty Five)

broadcom のページから最新バージョンを探す
今回は2022/01/26にリリースされてた007.2002.0000.0000 を入れる

STORCLI_SAS3.5_P22 をクリック
Click here to Download を右クリックしzip のURLを取得する。
今回は https://docs.broadcom.com/docs/STORCLI_SAS3.5_P22.zip となる
取得したurlをcurlしてunzipしてrpmでインストールするだけ

[root@fedora ~]# curl -OL https://docs.broadcom.com/docs-and-downloads/host-bus-adapters/host-bus-adapters-common-files/sas_sata_nvme_12g_p21/STORCLI_SAS3.5_P21.zip
  % Total    % Received % Xferd  Average Speed   Time    Time     Time  Current
                                 Dload  Upload   Total   Spent    Left  Speed
100 32.5M  100 32.5M    0     0  10.3M      0  0:00:03  0:00:03 --:--:-- 10.3M
[root@fedora ~]# unzip STORCLI_SAS3.5_P21.zip 
Archive:  STORCLI_SAS3.5_P21.zip
  inflating: STORCLI_SAS3.5_P21/MR_SAS_Unified_StorCLI--007.2002.0000.0000.pdf  
   creating: STORCLI_SAS3.5_P21/univ_viva_cli_rel/
   creating: STORCLI_SAS3.5_P21/univ_viva_cli_rel/Unified_storcli_all_os/
   creating: STORCLI_SAS3.5_P21/univ_viva_cli_rel/Unified_storcli_all_os/ARM/
   creating: STORCLI_SAS3.5_P21/univ_viva_cli_rel/Unified_storcli_all_os/ARM/EFI/
   creating: STORCLI_SAS3.5_P21/univ_viva_cli_rel/Unified_storcli_all_os/ARM/EFI/Debug/
  inflating: STORCLI_SAS3.5_P21/univ_viva_cli_rel/Unified_storcli_all_os/ARM/EFI/Debug/storcli.efi  
  inflating: STORCLI_SAS3.5_P21/univ_viva_cli_rel/Unified_storcli_all_os/ARM/EFI/storcli.efi  
   creating: STORCLI_SAS3.5_P21/univ_viva_cli_rel/Unified_storcli_all_os/ARM/Linux/
  inflating: STORCLI_SAS3.5_P21/univ_viva_cli_rel/Unified_storcli_all_os/ARM/Linux/storcli-007.2002.0000.0000-1.aarch64.rpm  
  inflating: STORCLI_SAS3.5_P21/univ_viva_cli_rel/Unified_storcli_all_os/ARM/Linux/storcli64.zip  
  inflating: STORCLI_SAS3.5_P21/univ_viva_cli_rel/Unified_storcli_all_os/ARM/Linux/storcli64_007.2002.0000.0000_arm64.deb  
   creating: STORCLI_SAS3.5_P21/univ_viva_cli_rel/Unified_storcli_all_os/ARM/Windows/
  inflating: STORCLI_SAS3.5_P21/univ_viva_cli_rel/Unified_storcli_all_os/ARM/Windows/StorCLI64.exe  
   creating: STORCLI_SAS3.5_P21/univ_viva_cli_rel/Unified_storcli_all_os/EFI/
   creating: STORCLI_SAS3.5_P21/univ_viva_cli_rel/Unified_storcli_all_os/EFI/Debug/
  inflating: STORCLI_SAS3.5_P21/univ_viva_cli_rel/Unified_storcli_all_os/EFI/Debug/storcli.efi  
  inflating: STORCLI_SAS3.5_P21/univ_viva_cli_rel/Unified_storcli_all_os/EFI/storcli.efi  
   creating: STORCLI_SAS3.5_P21/univ_viva_cli_rel/Unified_storcli_all_os/FreeBSD/
  inflating: STORCLI_SAS3.5_P21/univ_viva_cli_rel/Unified_storcli_all_os/FreeBSD/storcli64.tar  
   creating: STORCLI_SAS3.5_P21/univ_viva_cli_rel/Unified_storcli_all_os/JSON-Schema/
  inflating: STORCLI_SAS3.5_P21/univ_viva_cli_rel/Unified_storcli_all_os/JSON-Schema/JSON_SCHEMA_FILES.zip  
   creating: STORCLI_SAS3.5_P21/univ_viva_cli_rel/Unified_storcli_all_os/Linux/
  inflating: STORCLI_SAS3.5_P21/univ_viva_cli_rel/Unified_storcli_all_os/Linux/pubKey.asc  
  inflating: STORCLI_SAS3.5_P21/univ_viva_cli_rel/Unified_storcli_all_os/Linux/splitpackage.sh  
  inflating: STORCLI_SAS3.5_P21/univ_viva_cli_rel/Unified_storcli_all_os/Linux/storcli-007.2002.0000.0000-1.noarch.rpm  
   creating: STORCLI_SAS3.5_P21/univ_viva_cli_rel/Unified_storcli_all_os/Linux-PPC/
   creating: STORCLI_SAS3.5_P21/univ_viva_cli_rel/Unified_storcli_all_os/Linux-PPC/BigEndian/
  inflating: STORCLI_SAS3.5_P21/univ_viva_cli_rel/Unified_storcli_all_os/Linux-PPC/BigEndian/storcli64.zip  
   creating: STORCLI_SAS3.5_P21/univ_viva_cli_rel/Unified_storcli_all_os/Linux-PPC/LittleEndian/
  inflating: STORCLI_SAS3.5_P21/univ_viva_cli_rel/Unified_storcli_all_os/Linux-PPC/LittleEndian/storcli64.zip  
  inflating: STORCLI_SAS3.5_P21/univ_viva_cli_rel/Unified_storcli_all_os/Linux-PPC/LittleEndian/storcli64_007.2002.0000.0000_ppc64el.deb  
  inflating: STORCLI_SAS3.5_P21/univ_viva_cli_rel/Unified_storcli_all_os/readme.txt  
  inflating: STORCLI_SAS3.5_P21/univ_viva_cli_rel/Unified_storcli_all_os/storcliconf.ini  
  inflating: STORCLI_SAS3.5_P21/univ_viva_cli_rel/Unified_storcli_all_os/ThirdPartyLicenseNotice.pdf  
   creating: STORCLI_SAS3.5_P21/univ_viva_cli_rel/Unified_storcli_all_os/Ubuntu/
  inflating: STORCLI_SAS3.5_P21/univ_viva_cli_rel/Unified_storcli_all_os/Ubuntu/storcli_007.2002.0000.0000_all.deb  
   creating: STORCLI_SAS3.5_P21/univ_viva_cli_rel/Unified_storcli_all_os/VMware/
   creating: STORCLI_SAS3.5_P21/univ_viva_cli_rel/Unified_storcli_all_os/VMware/VMwareOP/
  inflating: STORCLI_SAS3.5_P21/univ_viva_cli_rel/Unified_storcli_all_os/VMware/VMwareOP/bulletin.xml  
  inflating: STORCLI_SAS3.5_P21/univ_viva_cli_rel/Unified_storcli_all_os/VMware/VMwareOP/vmware-storcli.vib  
   creating: STORCLI_SAS3.5_P21/univ_viva_cli_rel/Unified_storcli_all_os/VMware/VMwareOP64/
  inflating: STORCLI_SAS3.5_P21/univ_viva_cli_rel/Unified_storcli_all_os/VMware/VMwareOP64/VMWare-ESXi7.0-StorCLI.zip  
   creating: STORCLI_SAS3.5_P21/univ_viva_cli_rel/Unified_storcli_all_os/Windows/
  inflating: STORCLI_SAS3.5_P21/univ_viva_cli_rel/Unified_storcli_all_os/Windows/storcli64.exe  
[root@fedora ~]# cd STORCLI_SAS3.5_P21/univ_viva_cli_rel/Unified_storcli_all_os/Linux/
[root@fedora Linux]# ll
total 2108
-rw-r--r--. 1 root root    1727 Sep 13 17:38 pubKey.asc
-rw-r--r--. 1 root root    4043 Jun 15  2018 splitpackage.sh
-rw-r--r--. 1 root root 2149664 Oct 11 13:25 storcli-007.2002.0000.0000-1.noarch.rpm
[root@fedora Linux]# rpm -ivh storcli-007.2002.0000.0000-1.noarch.rpm 
warning: storcli-007.2002.0000.0000-1.noarch.rpm: Header V3 RSA/SHA256 Signature, key ID cb529165: NOKEY
Verifying...                          ################################# [100%]
Preparing...                          ################################# [100%]
Updating / installing...
   1:storcli-007.2002.0000.0000-1     ################################# [100%]
[root@fedora ~]# /opt/MegaRAID/storcli/storcli64 -v

      StorCli SAS Customization Utility Ver 007.2002.0000.0000 Oct 11, 2021

    (c)Copyright 2021, Broadcom Inc. All Rights Reserved.


[root@fedora ~]# 

setodaNoteCTF write up

setodanoteCTF やってみました。
他の人もwrite upを公開しているので他の人より簡単な方法で解けたものだけピックアップ


Redacted

Redacted
150
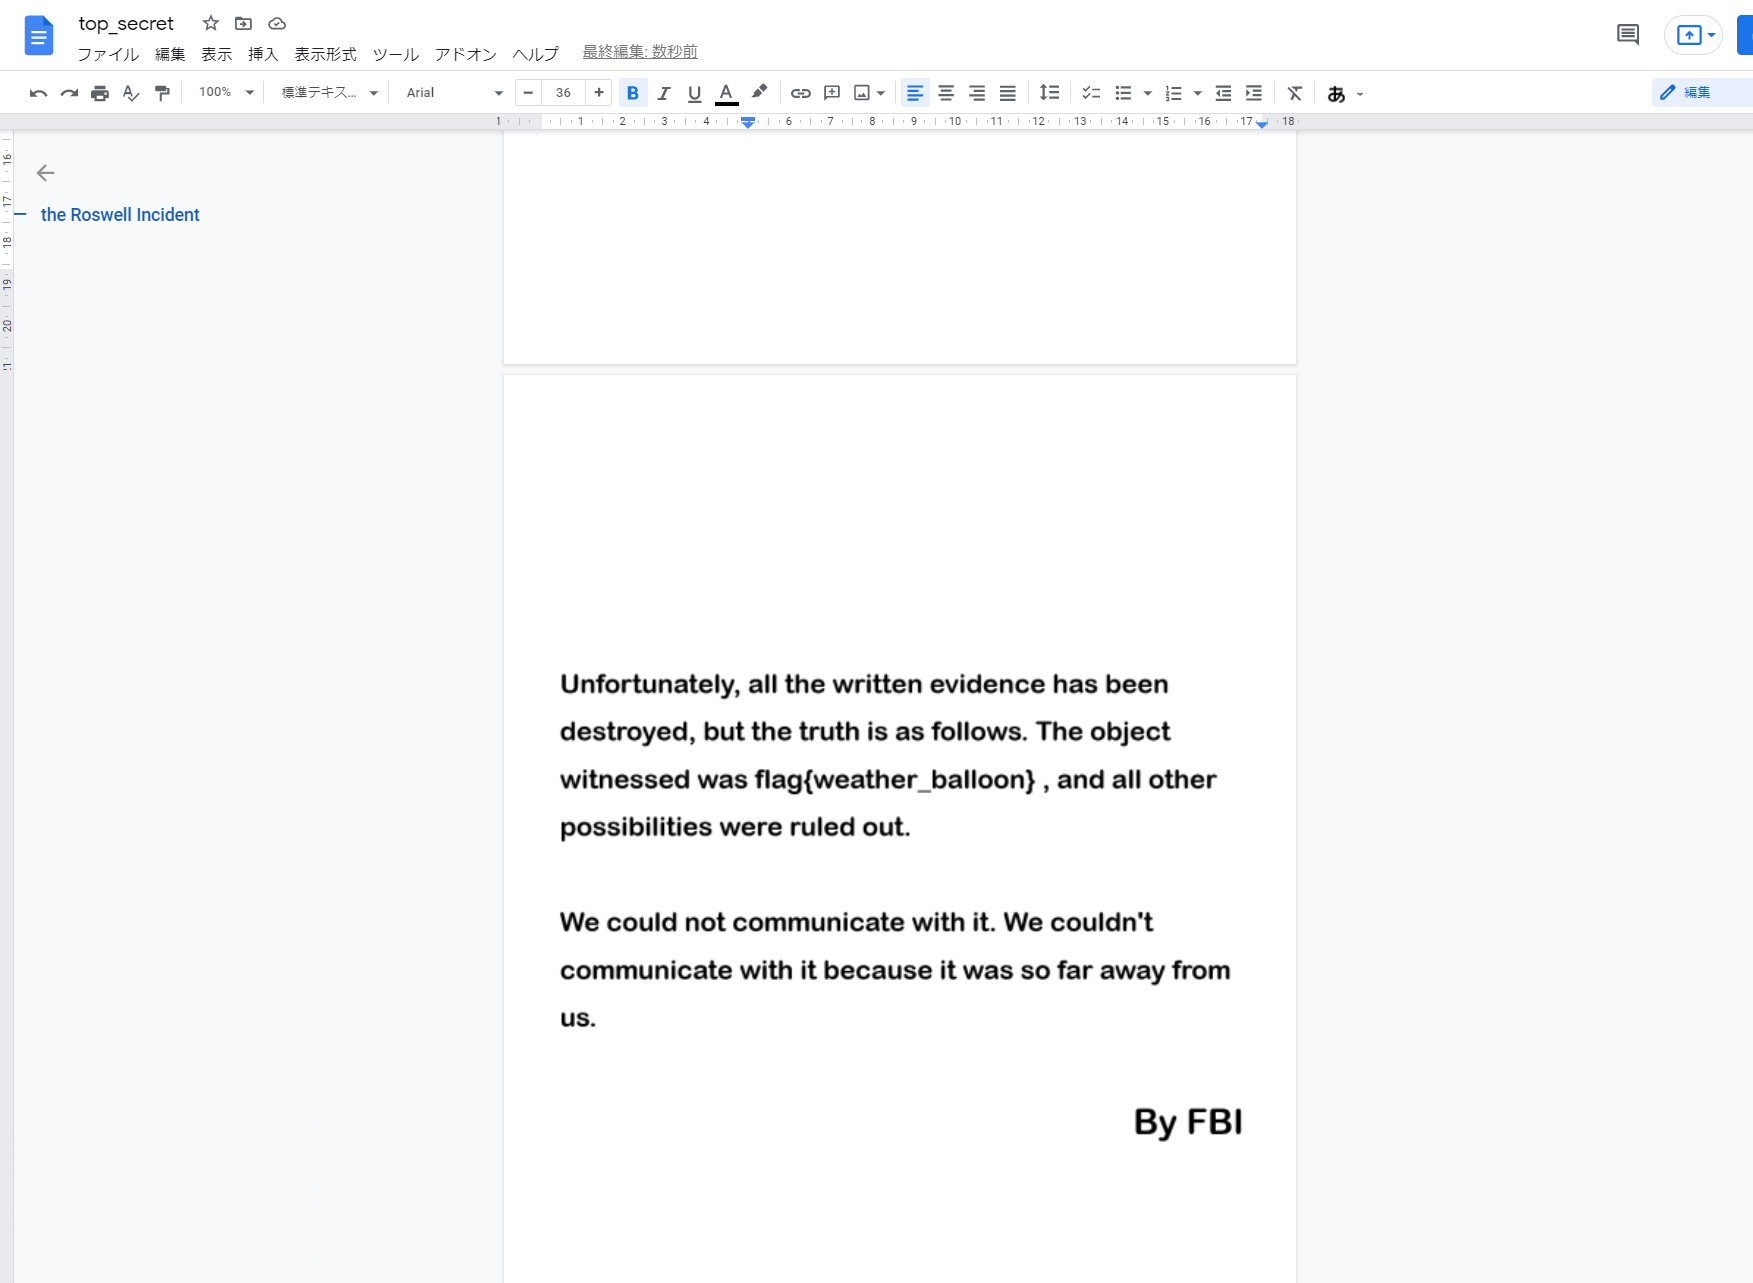
あなたの友人のジャーナリストは極秘ファイルの入手に成功しました。ですが重要な部分が黒塗りにされてしまっているようです。このままでは真実が闇に葬り去られてしまいます。あなたは極秘ファイルの解析を依頼されました。

添付されたファイルを解析し、真実を明らかにしてください。

MS Officeが無かった のでgoogle ドキュメントに突っ込んでみたらなんかできた


pui_pui

pui_pui
80
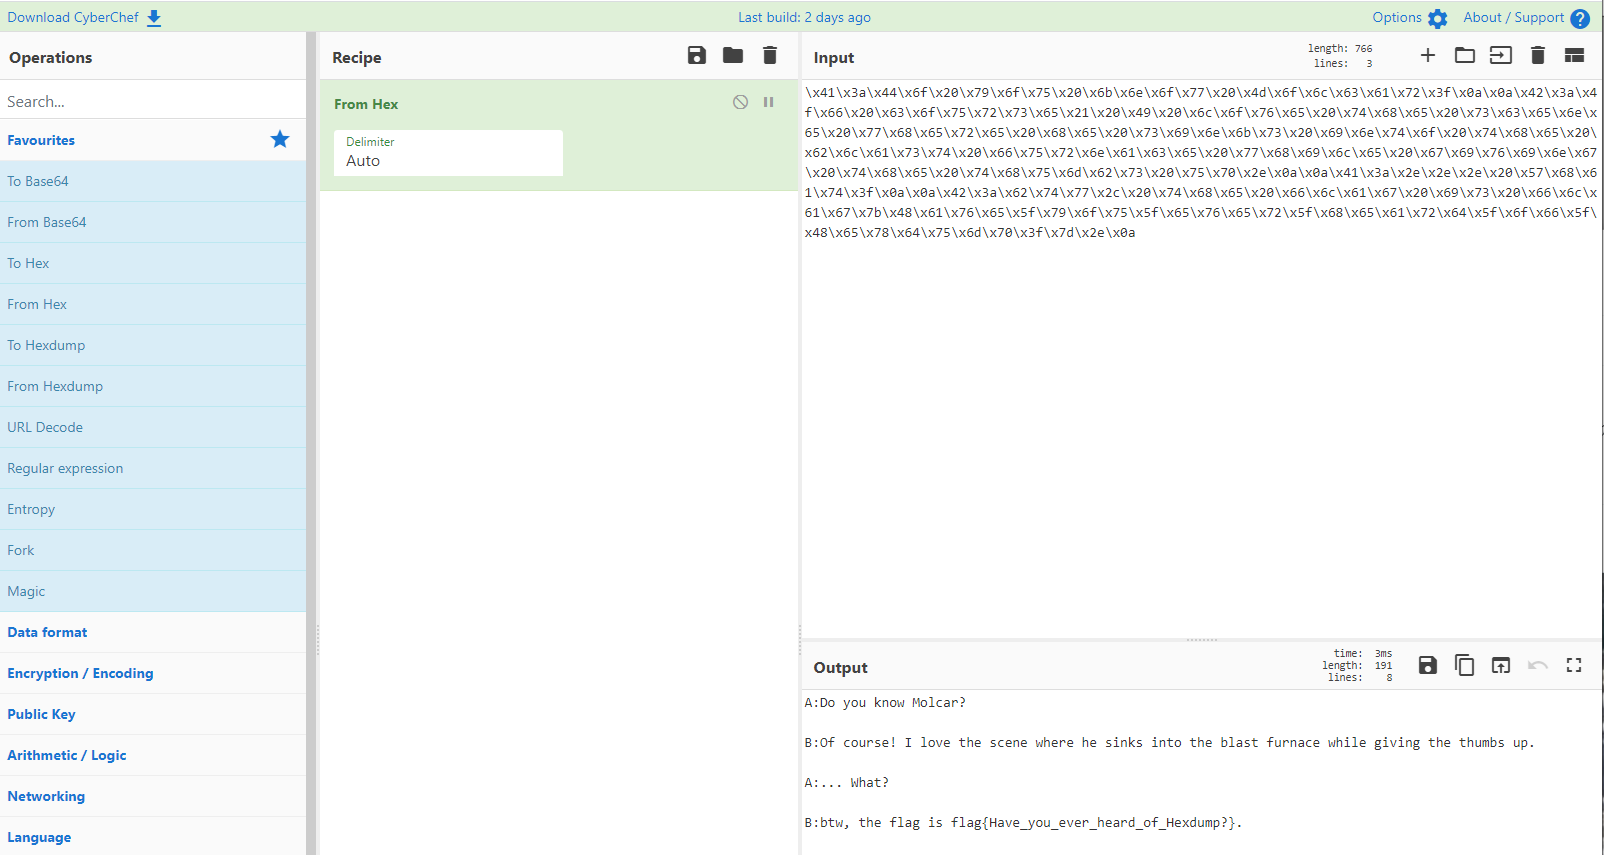
組織の局長からチャットが来ました。ですが普通の文字列ではなく暗号文になっているようです。どうやらこの組織には暇人しかいないようです。

以下の文字列を変換して、フラグを獲得してください。

\x41\x3a\x44\x6f\x20\x79\x6f\x75\x20\x6b\x6e\x6f\x77\x20\x4d\x6f\x6c\x63\x61\x72\x3f\x0a\x0a\x42\x3a\x4f\x66\x20\x63\x6f\x75\x72\x73\x65\x21\x20\x49\x20\x6c\x6f\x76\x65\x20\x74\x68\x65\x20\x73\x63\x65\x6e\x65\x20\x77\x68\x65\x72\x65\x20\x68\x65\x20\x73\x69\x6e\x6b\x73\x20\x69\x6e\x74\x6f\x20\x74\x68\x65\x20\x62\x6c\x61\x73\x74\x20\x66\x75\x72\x6e\x61\x63\x65\x20\x77\x68\x69\x6c\x65\x20\x67\x69\x76\x69\x6e\x67\x20\x74\x68\x65\x20\x74\x68\x75\x6d\x62\x73\x20\x75\x70\x2e\x0a\x0a\x41\x3a\x2e\x2e\x2e\x20\x57\x68\x61\x74\x3f\x0a\x0a\x42\x3a\x62\x74\x77\x2c\x20\x74\x68\x65\x20\x66\x6c\x61\x67\x20\x69\x73\x20\x66\x6c\x61\x67\x7b\x48\x61\x76\x65\x5f\x79\x6f\x75\x5f\x65\x76\x65\x72\x5f\x68\x65\x61\x72\x64\x5f\x6f\x66\x5f\x48\x65\x78\x64\x75\x6d\x70\x3f\x7d\x2e\x0a

https://gchq.github.io/CyberChef/ に突っ込んでみた


tkys_secret_service

tkys_secret_service
120
分担が一区切りし拠点に立ち寄っていた後輩から、あなたが3か月前に送ってきたチャットが結局なんだったのか解けないでいると話しかけられました。そういえば暇だったから意味もなく秘匿回線で内偵中の後輩に暗号文を送っていたことを思い出します。

以下の文字列を解析してフラグを入手してください。

Gur cevgrsgbvh vp Pvhgevyyrq Hhsynmmbpbrq Vhpvezngbvh (PHV) ermbqrhg bh hvhprqreny mlmgrzm nhq vetnhbfngbvhm bm vp cnenzvahg bzcvegnhsr gv prqreny ntrhsbrm nhq snh qbersgyl bzcnsg gur nobybgl vp gur prqreny tvirehzrhg gv massrmmpayyl svhqasg bgm rmmrhgbny zbmmbvhm nhq pahsgbvhm. Gubm caoybsngbvh cevibqrm ntrhsbrm jbgu ersvzzrhqrq mrsaebgl erdaberzrhgm pve cevgrsgbht gur svhpbqrhgbnybgl vp PHV jurh gur bhpvezngbvh bm ermbqrhg bh hvhprqreny mlmgrzm nhq vetnhbfngbvhm; jurh gur hvhprqreny vetnhbfngbvh bm hvg svyyrsgbht ve znbhgnbhbht bhpvezngbvh vh orunyp vp n prqreny ntrhsl ve ambht ve vcrengbht n mlmgrz vh orunyp vp nh ntrhsl; nhq jurer gurer ner hv mcrsbpbs mnprtaneqbht erdaberzrhgm pve cevgrsgbht gur svhpbqrhgbnybgl vp Synt bm pynt{cabcab_sne_vp_zvy} PHV cermseborq ol gur naguvebfbht ynj, ertayngbvh, ve tvirehzrhgjbqr cvybsl pve gur PHV sngrtvel ybmgrq bh gur PHV Ertbmgel. Gur erdaberzrhgm nccyl gv nyy svzcvhrhgm vp hvhprqreny mlmgrzm nhq vetnhbfngbvhm gung cevsrmm, mgver, nhq/ve genhmzbg PHV, ve gung cevibqr cevgrsgbvh pve masu svzcvhrhgm. Gur mrsaebgl erdaberzrhgm ner bhgrhqrq pve amr ol prqreny ntrhsbrm bh svhgensgany irubsyrm ve vgure nterrzrhgm rmgnoybmurq orgjrrh guvmr ntrhsbrm nhq hvhprqreny vetnhbfngbvhm.

https://quipqiup.com/ これに突っ込むだけ


ZZZIPPP

ZZZIPPP
80
あなたはあるファイルの解析作業を依頼されました。何重にも入れ子になった箱のようなファイルのようで、その中に組織にとって重要な機密情報が入っているようです。

添付されたファイルを解析してフラグを入手してください。

for文でunzipするだけ

# for i in {1000..1}; do unzip flag${i}.zip; done


EZZZIPPP

EZZZIPPP
150
あなたは再びあるファイルの解析作業を依頼されました。何重にも入れ子になった箱のようなファイルですが、今度は鍵までかかっているようです。ファイルを解析し中に封じ込められている機密情報を取得してください。

ファイルを解析してフラグを入手してください。

パスワード追加して上書きのメッセージが出ないようにした

# for i in {1000..1}; do unzip -P $(cat pass.txt) -o flag${i}.zip; done


deep_thought

deep_thought
250
計算勝負をしましょう。普段は寡黙に働き続けているサーバが不意に話しかけてきました。あなたは珍しいこともあるものだと思いつつも、そのサーバからの挑戦を受けることにしました。

以下にアクセスしてフラグを得てください。

nc 10.1.1.10 12010

この設問では Linux ターミナルを使用します。
https://ctf.setodanote.net/webshell/

https://nkhrlab.hatenablog.com/entry/2017/10/19/205829 これそのままコピペしただけ


echo_me

echo_me
120
山登りが趣味だという同僚が疲れた様子で話しかけてきます。山でヤッホーと声を出せば、いつでもヤッホーと返ってくる。そんなあたりまえを支えるやまびこさんの気持ちって、どんな感じなんでしょうね。その眼には若干の狂気が宿っているようにも思えました。あなたは同僚を狂気から救うため、解析作業を手伝うことにしました。

以下にアクセスしてフラグを得てください。

nc 10.1.1.10 12020

この設問では Linux ターミナルを使用します。
https://ctf.setodanote.net/webshell/

上で使ったやつをちょこっと改変しただけ

  if response =~ /[\d]/ then
    answer = response.gsub(/[^\d]/, "").to_i
    print_if_not_int(answer.to_s + "\n")
    $sockout.write(answer.to_s + "\n")
  end

chinachuで全番組録画サーバーを作る

chinachuで全番組録画サーバーを作る

Ubuntu20.04とPX-MLT5PEとchinachuで録画サーバーを作る
PX-MLT5PE 2台を一つの(9ピン)USBコネクタで接続する
を組み合わせ全録鯖を作る

諸々終わるとデバイスが生えてくる

$ ls -l /dev/pxmlt5video*
crw-rw-r-- 1 root video 240, 0 Jun 26 00:41 /dev/pxmlt5video0
crw-rw-r-- 1 root video 240, 1 Jun 26 00:41 /dev/pxmlt5video1
crw-rw-r-- 1 root video 240, 2 Jun 26 00:41 /dev/pxmlt5video2
crw-rw-r-- 1 root video 240, 3 Jun 26 00:41 /dev/pxmlt5video3
crw-rw-r-- 1 root video 240, 4 Jun 26 00:41 /dev/pxmlt5video4
crw-rw-r-- 1 root video 240, 5 Jun 26 00:41 /dev/pxmlt5video5
crw-rw-r-- 1 root video 240, 6 Jun 26 00:41 /dev/pxmlt5video6
crw-rw-r-- 1 root video 240, 7 Jun 26 00:41 /dev/pxmlt5video7
crw-rw-r-- 1 root video 240, 8 Jun 26 00:41 /dev/pxmlt5video8
crw-rw-r-- 1 root video 240, 9 Jun 26 00:41 /dev/pxmlt5video9

chinachuのWEB UIには見ない(録画しない)チャンネルが生えてくるのでこれをconfig.jsonのexcludeServicesを書き換えて消す

不要なチャンネルIDはmirakurunのAPIを叩いて取得する。

$ curl -s "http://localhost:40772/api/services" | jq . 
[
  {
    "id": 3273601024,
    "serviceId": 1024,
    "networkId": 32736,
    "name": "NHK総合1・東京",
    "type": 1,
    "logoId": 0,
    "remoteControlKeyId": 1,
    "channel": {
      "type": "GR",
      "channel": "27"
    },
    "hasLogoData": true
  },
(...snip....)
  {
    "id": 3239723656,
    "serviceId": 23656,
    "networkId": 32397,
    "name": "J:COMテレビ",
    "type": 1,
    "logoId": 0,
    "remoteControlKeyId": 10,
    "channel": {
      "type": "GR",
      "channel": "13"
    },
    "hasLogoData": true
  },
  {
    "id": 3239723657,
    "serviceId": 23657,
    "networkId": 32397,
    "name": "J:COMテレビ",
    "type": 1,
    "logoId": 0,
    "remoteControlKeyId": 10,
    "channel": {
      "type": "GR",
      "channel": "13"
    },
    "hasLogoData": true
  },
  {
    "id": 3233527768,
    "serviceId": 27768,
    "networkId": 32335,
    "name": "J:COMチャンネル",
    "type": 1,
    "logoId": 10,
    "remoteControlKeyId": 11,
    "channel": {
      "type": "GR",
      "channel": "37"
    },
    "hasLogoData": true
  },
  {
    "id": 3233527769,
    "serviceId": 27769,
    "networkId": 32335,
    "name": "J:COMチャンネル",
    "type": 1,
    "logoId": 10,
    "remoteControlKeyId": 11,
    "channel": {
      "type": "GR",
      "channel": "37"
    },
    "hasLogoData": true
  },
  {
    "id": 3233527770,
    "serviceId": 27770,
    "networkId": 32335,
    "name": "J:COMチャンネル",
    "type": 1,
    "logoId": 10,
    "remoteControlKeyId": 11,
    "channel": {
      "type": "GR",
      "channel": "37"
    },
    "hasLogoData": true
  }
]

もっと見やすくするとこんな感じ

$ curl -s "http://localhost:40772/api/services" | jq ".[] | {name: .name, id: .id}"
{
  "name": "NHK総合1・東京",
  "id": 3273601024
}
(...snip....)
{
  "name": "J:COMテレビ",
  "id": 3239723656
}
{
  "name": "J:COMテレビ",
  "id": 3239723657
}
{
  "name": "J:COMチャンネル",
  "id": 3233527768
}
{
  "name": "J:COMチャンネル",
  "id": 3233527769
}
{
  "name": "J:COMチャンネル",
  "id": 3233527770
}

こんな感じにconfig.jsonのexcludeServices部分を書き足す

  "excludeServices": [
    3273701416,
    3232728088,
    3273901183,
    3274201456,
    3239123992,
    3239123993,
    3273601408,
    3273601025,
    3273701034,
    3232727705,
    3239723656,
    3239723657,
    3233527768,
    3233527769,
    3233527770,
    3239123610
  ],

pm2をリスタートさせる

$ sudo pm2 restart all

減った

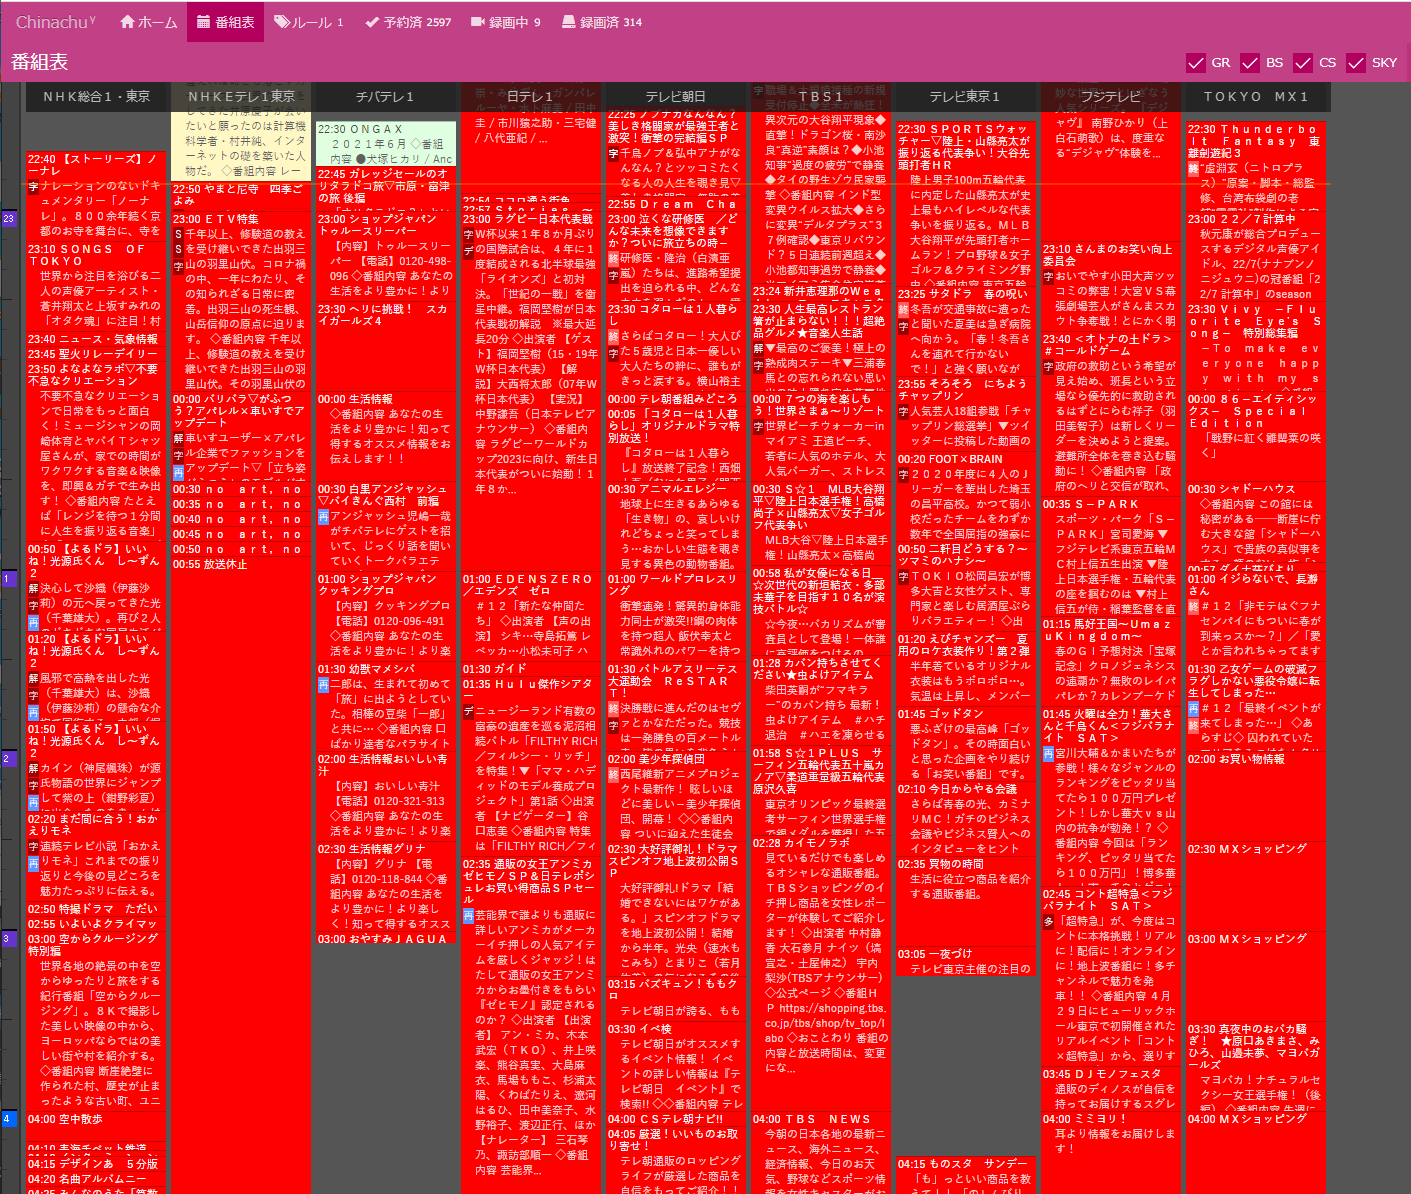
GR(地上波)全部録画するのでチェックして作成

全部録画出来る

マルチチャンネルはexcludeServicesで弾かないと行けない(対象CHだけでは不十分)のがポイント

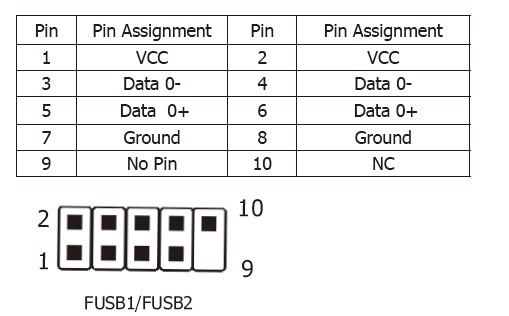
PX-MLT5PE 2台を一つの(9ピン)USBコネクタで接続する

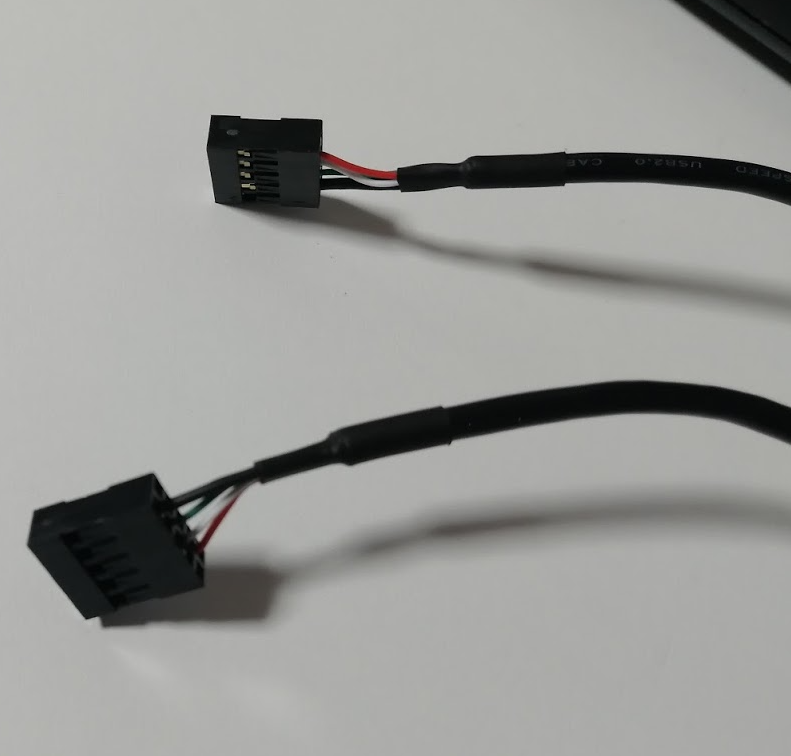
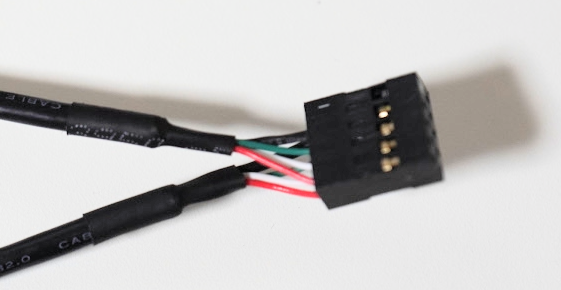
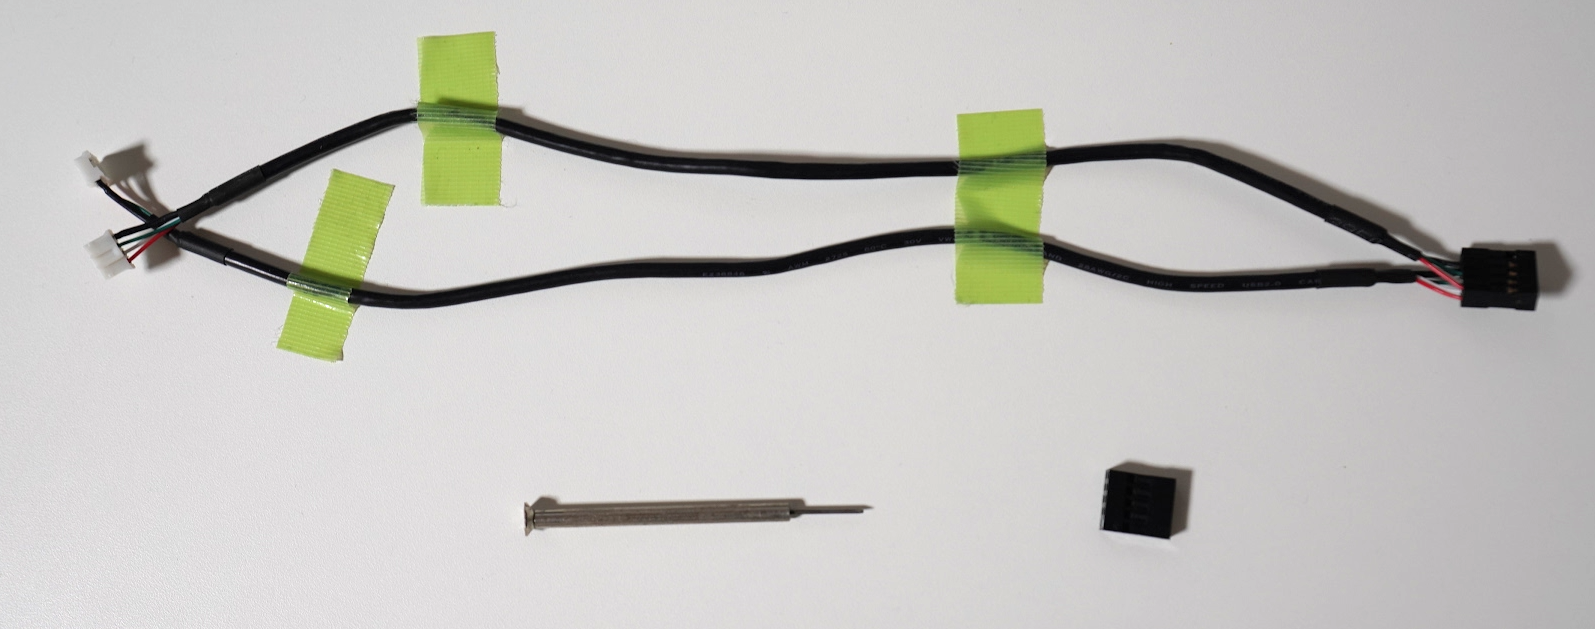
PX-MLT5PEを2台PCに繋げたいんですが、マザーボード側に9ピンのコネクター1つしかついてないのでコネクタを弄って2つつけられるようにします。

9ピンの構造としてUSB2.0*2が生えるイメージなので、もう一本同じ様に配線するだけ

付属のコネクタ*2 を用意

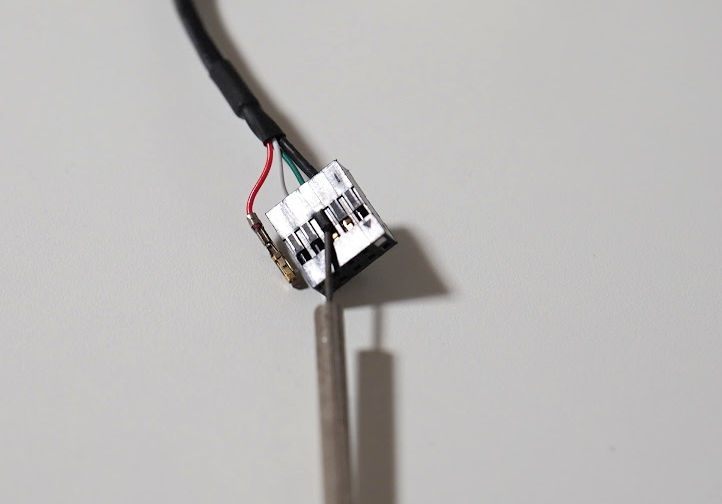
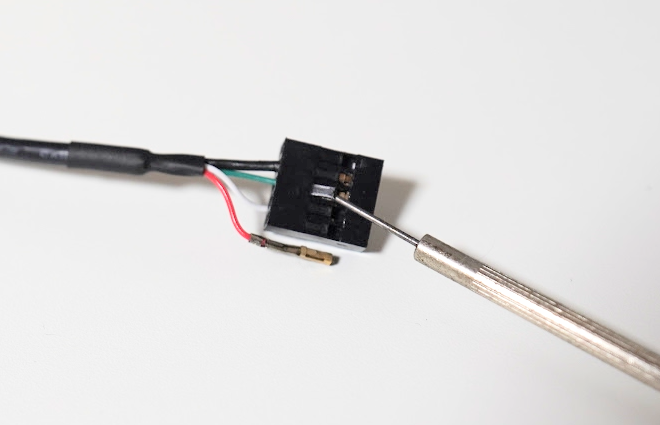
一つ細いマイナスドライバーなどで爪を持ち上げ中のピンを外す

もう一個のコネクタの方に同じ様に挿す

出来上がり

あとは通常と同様にケーブルをカードとマザーボードに挿してドライバーを入れるだけ

$ ls -l /dev/pxmlt5video*
crw-rw-r-- 1 root video 240, 0 Jun 26 00:41 /dev/pxmlt5video0
crw-rw-r-- 1 root video 240, 1 Jun 26 00:41 /dev/pxmlt5video1
crw-rw-r-- 1 root video 240, 2 Jun 26 00:41 /dev/pxmlt5video2
crw-rw-r-- 1 root video 240, 3 Jun 26 00:41 /dev/pxmlt5video3
crw-rw-r-- 1 root video 240, 4 Jun 26 00:41 /dev/pxmlt5video4
crw-rw-r-- 1 root video 240, 5 Jun 26 00:41 /dev/pxmlt5video5
crw-rw-r-- 1 root video 240, 6 Jun 26 00:41 /dev/pxmlt5video6
crw-rw-r-- 1 root video 240, 7 Jun 26 00:41 /dev/pxmlt5video7
crw-rw-r-- 1 root video 240, 8 Jun 26 00:41 /dev/pxmlt5video8
crw-rw-r-- 1 root video 240, 9 Jun 26 00:41 /dev/pxmlt5video9

windows10 でディスプレイの電源が自動で切れなくなったときの対処法

PCの電源が常に入ってる状態でログオフし数分置いとくといつもは勝手にでディスプレイの電源が切れるが何かの拍子に切れない事があるのでそれのメモ

結論から言うとvlcが邪魔していて動作していなかったよう

このページが参考になりました。
いくら待ってもスリープ状態にならない時の原因と対処法 (Windows)

次に、下記を実行してみてください。

C:\WINDOWS\system32> powercfg /requests

このコマンドは、アプリケーションとドライバーの電源要求を列挙します。電源要求があると、ディスプレイの電源を自動的に切ることや、低電力のスリープ状態に移行することができません。

DISPLAY:「ディスプレイの電源を切る」
SYSTEM:「PCをスリープ状態にする」
AWAYMODE:「退席中モード」

とりあえず、cmd.exeを管理者モードで起動しコマンドを打ってみる

C:\Users\sekki>powercfg /requests
DISPLAY:
[PROCESS] \Device\HarddiskVolume4\Program Files\VideoLAN\VLC\vlc.exe
[PROCESS] \Device\HarddiskVolume4\Program Files (x86)\Google\Chrome\Application\chrome.exe
Video Wake Lock

SYSTEM:
[DRIVER] Realtek High Definition Audio (HDAUDIO\FUNC_01&VEN_10EC&DEV_0900&SUBSYS_104386AE&REV_1000\4&2de74382&0&0001)
現在 1 つのオーディオ ストリームが使用中です。
[PROCESS] \Device\HarddiskVolume4\Program Files\VideoLAN\VLC\vlc.exe
[DRIVER] レガシー カーネルの呼び出し元

AWAYMODE:
なし。

実行:
[PROCESS] \Device\HarddiskVolume4\Program Files (x86)\Google\Chrome\Application\chrome.exe
WebRTC has active PeerConnections

PERFBOOST:
なし。

ACTIVELOCKSCREEN:
なし。

多分このプロセスが邪魔している(chromeは音楽を流していたせい)
vlc.exeは起動していないのになぜかプロセスが残っていた。

DISPLAY:
[PROCESS] \Device\HarddiskVolume4\Program Files\VideoLAN\VLC\vlc.exe
[PROCESS] \Device\HarddiskVolume4\Program Files (x86)\Google\Chrome\Application\chrome.exe
Video Wake Lock

タスクマネージャーからvlcのプロセスを殺す。

DISPLAY:
[PROCESS] \Device\HarddiskVolume4\Program Files (x86)\Google\Chrome\Application\chrome.exe
Video Wake Lock

chromeの音楽を止めると

DISPLAY:
なし。

となる

何もしてない状態だとこんな感じ

C:\Users\sekki>powercfg /requests
DISPLAY:
なし。

SYSTEM:
[DRIVER] Realtek High Definition Audio (HDAUDIO\FUNC_01&VEN_10EC&DEV_0900&SUBSYS_104386AE&REV_1000\4&2de74382&0&0001)
現在 1 つのオーディオ ストリームが使用中です。

AWAYMODE:
なし。

実行:
なし。

PERFBOOST:
なし。

ACTIVELOCKSCREEN:
なし。

これで無事画面が消えるようになりました。
とりあえず、(ディスプレイの画面を消す場合)DISPLAYが「なし。」になる事が重要そうです。

今回はVLCのプロセスを殺して解決しましたが頻発するようであれば下記のようなコマンドで行けそう?(未確認)

powercfg -requestsoverride PROCESS  "\Device\HarddiskVolume4\Program Files\VideoLAN\VLC\vlc.exe" DISPLAY

Ubuntu20.04とPX-MLT5PEとchinachuで録画サーバーを作る

環境

$ cat /etc/os-release
NAME="Ubuntu"
VERSION="20.04.1 LTS (Focal Fossa)"
ID=ubuntu
ID_LIKE=debian
PRETTY_NAME="Ubuntu 20.04.1 LTS"
VERSION_ID="20.04"
HOME_URL="https://www.ubuntu.com/"
SUPPORT_URL="https://help.ubuntu.com/"
BUG_REPORT_URL="https://bugs.launchpad.net/ubuntu/"
PRIVACY_POLICY_URL="https://www.ubuntu.com/legal/terms-and-policies/privacy-policy"
VERSION_CODENAME=focal
UBUNTU_CODENAME=focal
$ uname -r
5.4.0-58-generic

必要に応じてadduserでユーザーを作っておきsudoできるようにしておく

$ sudo adduser rec
$ sudo visudo 

#タイムゾーンの設定
$ timedatectl
               Local time: Tue 2020-12-29 08:29:51 UTC
           Universal time: Tue 2020-12-29 08:29:51 UTC
                 RTC time: Tue 2020-12-29 08:29:51    
                Time zone: Etc/UTC (UTC, +0000)       
System clock synchronized: yes                        
              NTP service: active                     
          RTC in local TZ: no   
$ sudo timedatectl set-timezone Asia/Tokyo
$ timedatectl
               Local time: Tue 2020-12-29 17:30:48 JST
           Universal time: Tue 2020-12-29 08:30:48 UTC
                 RTC time: Tue 2020-12-29 08:30:48    
                Time zone: Asia/Tokyo (JST, +0900)    
System clock synchronized: yes                        
              NTP service: active                     
          RTC in local TZ: no 

PX-MLT5PEドライバーのインストール
https://github.com/nns779/px4_drv を見ながら粛々と入れる

$ sudo apt install -y unzip gcc make
$ mkdir src
$ cd src/
$ git clone https://github.com/nns779/px4_drv.git
$ cd px4_drv/fwtool/
$ make
$ wget http://plex-net.co.jp/plex/pxw3u4/pxw3u4_BDA_ver1x64.zip -O pxw3u4_BDA_ver1x64.zip
$ unzip -oj pxw3u4_BDA_ver1x64.zip pxw3u4_BDA_ver1x64/PXW3U4.sys
$ ./fwtool PXW3U4.sys it930x-firmware.bin
$ mkdir -p /lib/firmware
$ sudo cp it930x-firmware.bin /lib/firmware/
$ cd ../
##### DKMSを使用しない場合
$ cd driver
$ make
$ sudo make install
#####
$ lsmod | grep -e ^px4_drv
$ ls /dev/pxmlt5video*
/dev/pxmlt5video0  /dev/pxmlt5video1  /dev/pxmlt5video2  /dev/pxmlt5video3  /dev/pxmlt5video4

ubuntuは自動的にカーネルがアップデートされるので、ドライバーが消えるのでDKMSでインストールしたほうが良いかもしれない。
(もしくはアップデートを自動で止める)

$ sudo cp -a ./ /usr/src/px4_drv-0.2.1
$ sudo dkms add px4_drv/0.2.1
$ sudo dkms install px4_drv/0.2.1
$ lsmod | grep -e ^px4_drv
px4_drv               143360  0
$ ls -l /dev/pxmlt5video*
crw-rw-r-- 1 root video 239, 0 Aug 23 22:37 /dev/pxmlt5video0
crw-rw-r-- 1 root video 239, 1 Aug 23 22:37 /dev/pxmlt5video1
crw-rw-r-- 1 root video 239, 2 Aug 23 22:37 /dev/pxmlt5video2
crw-rw-r-- 1 root video 239, 3 Aug 23 22:37 /dev/pxmlt5video3
crw-rw-r-- 1 root video 239, 4 Aug 23 22:37 /dev/pxmlt5video4
crw-rw-r-- 1 root video 239, 5 Aug 23 22:37 /dev/pxmlt5video5
crw-rw-r-- 1 root video 239, 6 Aug 23 22:37 /dev/pxmlt5video6
crw-rw-r-- 1 root video 239, 7 Aug 23 22:37 /dev/pxmlt5video7
crw-rw-r-- 1 root video 239, 8 Aug 23 22:37 /dev/pxmlt5video8
crw-rw-r-- 1 root video 239, 9 Aug 23 22:37 /dev/pxmlt5video9

カードリーダードライバのインストール
#好みのやり方で

arib25ライブラリのインストール

$ sudo apt install -y cmake  build-essential libpcsclite-dev

$ cd ~/src/
$ git clone https://github.com/stz2012/libarib25.git
$ cd libarib25/
$ cmake .
$ make
$ sudo make install
$ 

recpt1のインストール

$ cd ~/src/
$ wget http://plex-net.co.jp/download/linux/Linux_Driver.zip
$ unzip Linux_Driver.zip
$ cd Linux_Driver/MyRecpt1/MyRecpt1/recpt1
$ sed -i".org" 's/-DTV/video/g' pt1_dev.h
$ sh ./autogen.sh 
$ sh ./configure --enable-b25
$ make clean
$ make
$ sudo make install

録画の確認
エラーが出たら上の手順をやり直す

$ recpt1 --device /dev/pxmlt5video1 --b25 --strip --sid hd 27 10 test.ts
using device: /dev/pxmlt5video1
using B25...
enable B25 strip
device = /dev/pxmlt5video1
C/N = 22.501011dB
(PID:4648)(CH:T27) Recording...
Available sid = 1024 1025 1408 65520 
Chosen sid    = 1024
Available PMT = 0x1f0 0x3f0 0x1fc8 0x1cf0 
(PID:4648)(CH:T27) Recorded 10sec

–deviceでデバイスを指定しないとエラーになる。

$ recpt1 --b25 --strip --sid hd 27 10 test.ts
using B25...
enable B25 strip
(tune) Cannot tune to the specified channel

Mirakurunのインストール
この辺を見ながらインストール

$ sudo apt install -y pkg-config
$ curl -sL https://deb.nodesource.com/setup_14.x | sudo -E bash -
$ sudo apt-get install -y nodejs
$ sudo npm install pm2 -g
$ sudo npm install mirakurun -g --unsafe-perm
$ sudo npm install rivarun -g
$ sudo npm install arib-b25-stream-test -g --unsafe
$ sudo mirakurun config tuners # 下のテキストっぽく修正
$ sudo mirakurun restart

中身はこんな感じ

- name: PX-MLT5PE0
  types:
    - GR
  command: /usr/local/bin/recpt1 --device /dev/pxmlt5video0 <channel> - -
  decoder: arib-b25-stream-test
  isDisabled: false

- name: PX-MLT5PE1
  types:
    - GR
  command: /usr/local/bin/recpt1 --device /dev/pxmlt5video1 <channel> - -
  decoder: arib-b25-stream-test
  isDisabled: false

- name: PX-MLT5PE2
  types:
    - GR
  command: /usr/local/bin/recpt1 --device /dev/pxmlt5video2 <channel> - -
  decoder: arib-b25-stream-test
  isDisabled: false

- name: PX-MLT5PE3
  types:
    - GR
  command: /usr/local/bin/recpt1 --device /dev/pxmlt5video3 <channel> - -
  decoder: arib-b25-stream-test
  isDisabled: false

- name: PX-MLT5PE4
  types:
    - GR
  command: /usr/local/bin/recpt1 --device /dev/pxmlt5video4 <channel> - -
  decoder: arib-b25-stream-test
  isDisabled: false

チャンネルが取得できる事を確認

$ curl -X PUT "http://localhost:40772/api/config/channels/scan"
channel scanning... (type: "GR")
(略)
-> total 11 channels found and 34 channels stored.

channel scan has completed and saved successfully.
**RESTART REQUIRED** to apply changes

この辺を見ながらChinachuインストール

$ sudo apt install -y python2
$ git clone git://github.com/Chinachu/Chinachu.git ~/chinachu
$ cd ~/chinachu/
$ EPYTHON=python2 ./chinachu installer
$ cp config.sample.json config.json
$ vim config.json #公式を見ながら修正
$ echo [] > rules.json
$ ./chinachu service wui execute
$ ./chinachu update
$ sudo pm2 start processes.json
$ sudo pm2 save
$ sudo pm2 startup

ubuntu20にはpython2系が入っていないのでそのまま./chinachu installer するとエラーになる

Installing Node Modules using NPM...

> mirakurun@2.15.2 preinstall /home/rec/chinachu/node_modules/mirakurun
> node bin/preinstall.js

Note: add `-g` to install Mirakurun as Server!

> diskusage@1.1.3 install /home/rec/chinachu/node_modules/diskusage
> node-gyp rebuild

gyp ERR! configure error 
gyp ERR! stack Error: Can't find Python executable "python", you can set the PYTHON env variable.
gyp ERR! stack     at PythonFinder.failNoPython (/home/rec/chinachu/.nave/installed/10.16.3/lib/node_modules/npm/node_modules/node-gyp/lib/configure.js:484:19)
gyp ERR! stack     at PythonFinder.<anonymous> (/home/rec/chinachu/.nave/installed/10.16.3/lib/node_modules/npm/node_modules/node-gyp/lib/configure.js:406:16)
gyp ERR! stack     at F (/home/rec/chinachu/.nave/installed/10.16.3/lib/node_modules/npm/node_modules/which/which.js:68:16)
gyp ERR! stack     at E (/home/rec/chinachu/.nave/installed/10.16.3/lib/node_modules/npm/node_modules/which/which.js:80:29)
gyp ERR! stack     at /home/rec/chinachu/.nave/installed/10.16.3/lib/node_modules/npm/node_modules/which/which.js:89:16
gyp ERR! stack     at /home/rec/chinachu/.nave/installed/10.16.3/lib/node_modules/npm/node_modules/isexe/index.js:42:5
gyp ERR! stack     at /home/rec/chinachu/.nave/installed/10.16.3/lib/node_modules/npm/node_modules/isexe/mode.js:8:5
gyp ERR! stack     at FSReqWrap.oncomplete (fs.js:153:21)
gyp ERR! System Linux 5.4.0-58-generic
gyp ERR! command "/home/rec/chinachu/.nave/installed/10.16.3/bin/node" "/home/rec/chinachu/.nave/installed/10.16.3/lib/node_modules/npm/node_modules/node-gyp/bin/node-gyp.js" "rebuild"
gyp ERR! cwd /home/rec/chinachu/node_modules/diskusage
gyp ERR! node -v v10.16.3
gyp ERR! node-gyp -v v3.8.0
gyp ERR! not ok 
npm ERR! code ELIFECYCLE
npm ERR! errno 1
npm ERR! diskusage@1.1.3 install: `node-gyp rebuild`
npm ERR! Exit status 1
npm ERR! 
npm ERR! Failed at the diskusage@1.1.3 install script.
npm ERR! This is probably not a problem with npm. There is likely additional logging output above.

npm ERR! A complete log of this run can be found in:
npm ERR!     /home/rec/.npm/_logs/2020-12-20T13_59_12_766Z-debug.log

> diskusage@1.1.3 install /home/rec/chinachu/node_modules/diskusage
> node-gyp rebuild

gyp ERR! configure error 
gyp ERR! stack Error: Can't find Python executable "python", you can set the PYTHON env variable.
gyp ERR! stack     at PythonFinder.failNoPython (/home/rec/chinachu/.nave/installed/10.16.3/lib/node_modules/npm/node_modules/node-gyp/lib/configure.js:484:19)
gyp ERR! stack     at PythonFinder.<anonymous> (/home/rec/chinachu/.nave/installed/10.16.3/lib/node_modules/npm/node_modules/node-gyp/lib/configure.js:406:16)
gyp ERR! stack     at F (/home/rec/chinachu/.nave/installed/10.16.3/lib/node_modules/npm/node_modules/which/which.js:68:16)
gyp ERR! stack     at E (/home/rec/chinachu/.nave/installed/10.16.3/lib/node_modules/npm/node_modules/which/which.js:80:29)
gyp ERR! stack     at /home/rec/chinachu/.nave/installed/10.16.3/lib/node_modules/npm/node_modules/which/which.js:89:16
gyp ERR! stack     at /home/rec/chinachu/.nave/installed/10.16.3/lib/node_modules/npm/node_modules/isexe/index.js:42:5
gyp ERR! stack     at /home/rec/chinachu/.nave/installed/10.16.3/lib/node_modules/npm/node_modules/isexe/mode.js:8:5
gyp ERR! stack     at FSReqWrap.oncomplete (fs.js:153:21)
gyp ERR! System Linux 5.4.0-58-generic
gyp ERR! command "/home/rec/chinachu/.nave/installed/10.16.3/bin/node" "/home/rec/chinachu/.nave/installed/10.16.3/lib/node_modules/npm/node_modules/node-gyp/bin/node-gyp.js" "rebuild"
gyp ERR! cwd /home/rec/chinachu/node_modules/diskusage
gyp ERR! node -v v10.16.3
gyp ERR! node-gyp -v v3.8.0
gyp ERR! not ok 
npm ERR! code ELIFECYCLE
npm ERR! errno 1
npm ERR! diskusage@1.1.3 install: `node-gyp rebuild`
npm ERR! Exit status 1
npm ERR! 
npm ERR! Failed at the diskusage@1.1.3 install script.
npm ERR! This is probably not a problem with npm. There is likely additional logging output above.

npm ERR! A complete log of this run can be found in:
npm ERR!     /home/rec/.npm/_logs/2020-12-20T13_59_16_061Z-debug.log
done.